If you’re like me, the ClearOS server needs to do the Dropbox syncing, not every client pc in the house separately. The whole idea is to have things centralized, isn’t it? Of course you can access the synced data from every client in the house.
In this short tutorial you’ll learn how to install Dropbox on your ClearOS All-in-One NAS and configure a sync to the users their home directory.
Installation
First start PuTTY and logon as root user to your ClearOS server.
Enter the following command:
# yum install -y app-dropbox
You’ll see something like this:
Dependencies Resolved

=====================================================================================
 Package                           Arch        Version            Repository    Size
=====================================================================================
Installing:
 app-dropbox                       noarch      1:1.6.7-1.v6       clearos      9.1 k
Installing for dependencies:
 app-dropbox-core                  noarch      1:1.6.7-1.v6       clearos       11 k
 app-user-dropbox                  noarch      1:1.6.0-1.v6       clearos       12 k
 app-user-dropbox-core             noarch      1:1.6.0-1.v6       clearos      5.2 k
 app-user-dropbox-plugin-core      noarch      1:1.0.0-1.v6       clearos      5.0 k
 dropbox                           x86_64      2.10.28-1.v6       clearos       24 M

Transaction Summary
=====================================================================================
Install 6 Package(s)

Total download size: 24 M
Installed size: 39 M
[...]
Installed:
  app-dropbox.noarch 1:1.6.7-1.v6

Dependency Installed:
  app-dropbox-core.noarch 1:1.6.7-1.v6
  app-user-dropbox.noarch 1:1.6.0-1.v6
  app-user-dropbox-core.noarch 1:1.6.0-1.v6
  app-user-dropbox-plugin-core.noarch 1:1.0.0-1.v6
  dropbox.x86_64 0:2.10.28-1.v6

Complete!
That’s it for the installation part!
Now that Dropbox is installed, you’re ready to configure it.
Configuration
You need to choose which of the users are allowed to sync their Dropboxes to their home directory on the server.
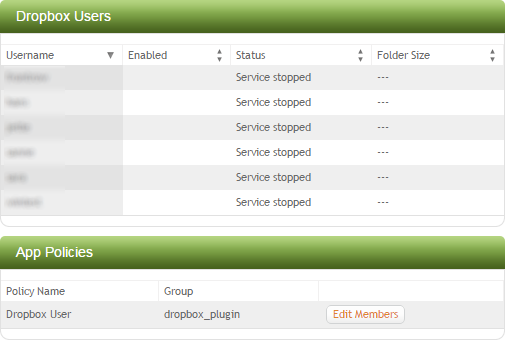
Logon in the Webconfig as user root (or any other admin account). Go to the ‘Cloud’ menu and choose item ‘Dropbox‘. You will see your users being listed, see below.
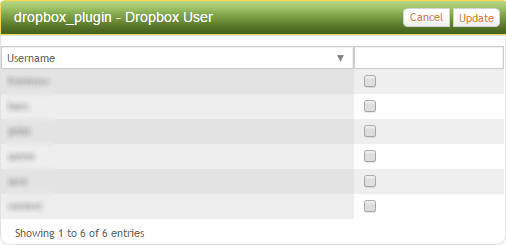
Now click on the button ‘Edit Members‘ to set which users are able to use Dropbox. You’ll see, again, the list of users on tour server. Choose which user can use Dropbox by putting a check in the corresponding box. Click the ‘Update‘ button when done.
Now ask your users to logon into the COS webconfig to make them configure their sync. Or you can do it yourself provided you have their credentials.
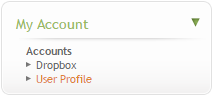
Logout the webconfig as admin user and logon as one of the Dropbox enabled normal user.
Click on the left menu item ‘My Account’ > ‘Accounts’ > ‘Dropbox‘.
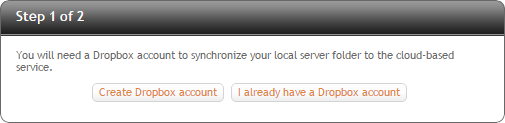
The Dropbox user-app will ask for the Dropbox account info. Click the ‘I already have a Dropbox account‘ button.
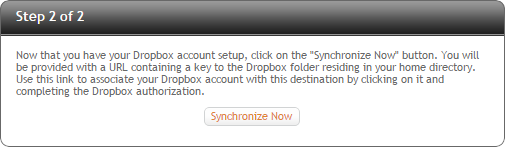
In the next step you are asked to make sure you want to syncronize. Click the button ‘Synchronize Now‘ when you are sure.
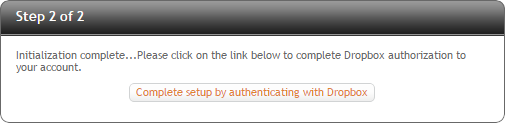
After a few seconds the button ‘Complete setup by authenticating with Dropbox‘ appears. This might be the longest button-name ever made :P
When you click the button your browser will open a new window/tab which leads to the Dropbox webpage. When logging in with the user’s Dropbox account you are telling Dropbox the COS server is save to use. After you’ve done this the Dropbox App starts syncing. Depending on the size of the Dropbox share and your internet connection, it can take a while.
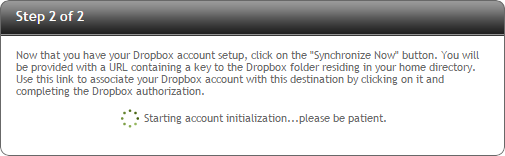
Note: The spinning wheel in the picture above, indicating the sync is busy, is not accurate. In fact, it just might be a stupid animated GIF which never ends! Better open up a PuTTY session and monitor the directory size or do a top command like this to see CPU% being used:
# top -p `pgrep dropbox | tr "\\n" "," | sed 's/,$//'`
check Dropbox folder size:
# du -sh /homer/user/Dropbox
Now you are finished creating a sync between the COS server and your Dropbox account.
You can access the Dropbox folder on your Windows PC like you used to, it’s located under ‘This PC’ (Win8.x) or ‘Computer’ (Win7) as a netwerk share with your username.
Have fun syncing!